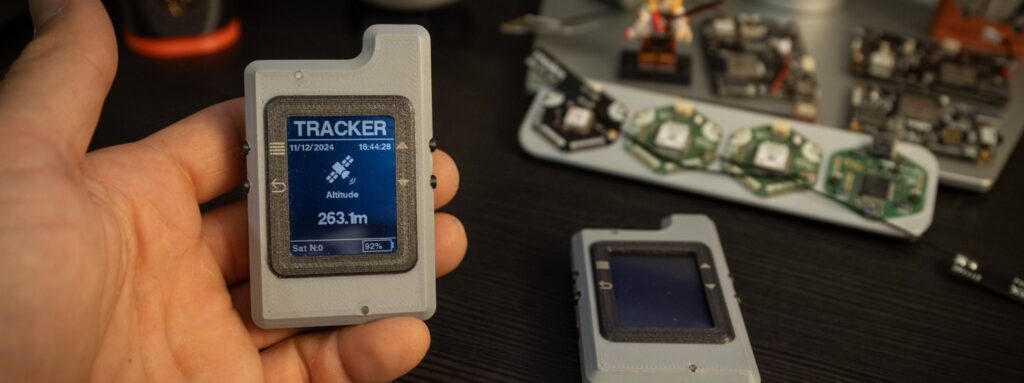
Welcome to the Pocket Tracker user guide. This section will walk you through how to use all the main features of your Pocket Tracker with the stock firmware. Whether you’re using it for tracking, logging, or its advanced sensor functionalities, here you’ll find quick and practical instructions to get started and make the most out of your device.
List of Contents
User Interface

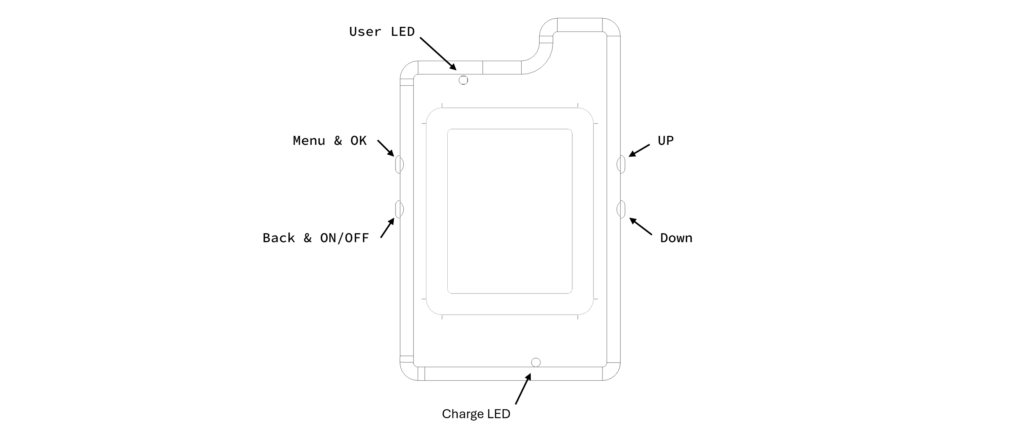
The Pocket Tracker features four buttons for intuitive navigation and control:
- Up Button (▲)
Scrolls up through menu items or increases values when editing settings. Use this to quickly navigate to previous options. - Down Button (▼)
Scrolls down through menu items or decreases values when editing settings. It makes it easy to navigate forward through options. - Menu/OK Button
Press to open the main menu or to enter sub-menus. When navigating, press this button to confirm selections or activate functionalities. - Back / On-Off Button
Press briefly to go back to the previous menu or screen.
Hold for more than 3 seconds to turn the Pocket Tracker on or off.
Powering ON
When you turn on the Pocket Tracker by holding the Back / On-Off button for more than 3 seconds, it will first display a startup screen showing information about the firmware version and hardware release. This helps you quickly check which version is installed.
After the startup screen, the device will load the main screen.
Note: To save battery, the GNSS module is off by default at startup.
Once on the main screen, you can use the Up (▲) and Down (▼) buttons to navigate through the statistics screens, where you will find various data such as:
- Distance travelled
- Altitude
- Speed
- And other key metrics
These screens let you monitor your activity and sensor data at a glance.
Settings Menu
After powering on your Pocket Tracker for the first time, it is recommended to check and adjust your settings.
How to access the Settings menu:
- From the main screen, press the Menu/OK button to open the menu.
- Use the Up (▲) and Down (▼) buttons to navigate to “Settings”.
- Press the Menu/OK button to enter the settings menu.
Settings options:
- Time Zone
Allows you to set your local time zone.
To change it, select Time Zone and press Menu/OK, then use Up or Down to select your UTC offset (e.g. UTC+1). Press Menu/OK again to confirm. - Invert Color
Inverts the display colors. This is purely a graphical option to match your visual preference or improve visibility in different lighting conditions. - Standby
Controls whether the Pocket Tracker will enter sleep mode after a period of inactivity to save battery.- If Standby is ON, the device will automatically sleep when not in use.
- If Standby is OFF, the device will remain on continuously.
- GPS Module
Allows you to turn the GNSS module on or off. Important: The GNSS module is off by default at startup to save battery. Remember to turn it on before starting any recording to ensure your tracks include position data and turn it off when finish to save battery. - Steps Counter:
Enables or disables the step counting functionality. It uses the BNO086 IMU’s built-in step detection in fusion mode.
The step count resets automatically every day, or when you disable the feature or reset statistics.
Note: When the step counter is ON, the IMU remains active continuously, which may result in slightly reduced battery life. - Save & Exit
Saves your current settings to internal memory and exits the settings menu. Note: The GNSS module status is not saved and will always default to off at startup to optimize battery life.
Reset Statistics
The Pocket Tracker continuously monitors sensor data:
- Even when the GNSS module is off, it keeps reading sensors like the barometric sensor, so it always tracks altitude gains.
- When the GNSS module is on, it continuously calculates distance, speed, and other metrics, even if you are not recording a track to the SD card.
When you start a track recording, all statistics are automatically reset. However, if you want to measure data without recording a track, you can manually reset the statistics to clear previous values.
How to reset statistics:
- From the main screen, press the Menu/OK button to open the menu.
- Use the Up (▲) and Down (▼) buttons to navigate to “Reset Statistics”.
- Press the Menu/OK button to reset all metrics.
After resetting, your altitude gain, distance, speed, and other tracked data will be cleared and start counting from zero.
Start New Recording
The Pocket Tracker records your tracks in standard GPX format, with a default sample rate of 1 point per second.
However, note that:
- If you remain still, it will not record duplicate points at the same position.
- If the GNSS signal is weak, the recording rate may automatically slow down to ensure accurate data.
How to start a new recording:
- From the main screen, press the Menu/OK button to open the menu.
- Use the Up (▲) and Down (▼) buttons to navigate to “Start New Recording”.
- Press Menu/OK to start.
When you start a new recording:
- Statistics are automatically reset.
- The timer starts, indicating the recording has begun.
While recording:
- You can pause recording or resume recording the recording by pressing Menu/OK, navigating to Pause/Resume, and confirming.
- To stop the recording, press Menu/OK, navigate to Stop recording, and press Menu/OK again.
When stopped, a GPX track file is created on the SD card. The file is automatically named based on the date and time of when the recording started, making it easy to identify and organize your tracks later.
Save and Open Waypoints
The Pocket Tracker allows you to record single locations (waypoints) onto the SD card in standard GPX format. Waypoints are especially useful for saving points of interest along with sensor data.
How to save a waypoint:
- From the main screen, press the Menu/OK button to open the menu.
- Use the Up (▲) and Down (▼) buttons to navigate to “Save Waypoint”.
- Press Menu/OK to save your current location as a waypoint.
Waypoints are particularly valuable when you have external sensors connected, as they allow you to save the location along with all sensor values at that moment. (More details on external sensors will be covered in a dedicated section.)
How to open a saved waypoint:
- From the main screen, press the Menu/OK button to open the menu.
- Use Up (▲) and Down (▼) to navigate to “Open Waypoint”.
- Press Menu/OK to enter.
This feature displays the list of saved waypoints stored on your SD card. You can:
- Scroll through the waypoints using the Up and Down buttons.
- For each waypoint, view:
- Date and time it was saved
- Coordinates (latitude and longitude)
- Distance from your current location (if GNSS is on and you have a fix)
- A compass pointer showing the direction to the waypoint
This allows you to easily navigate back to saved locations – simply follow the compass pointer to reach the selected waypoint.
Sensor Data
The Pocket Tracker allows you to view detailed sensor data directly from the device.
How to access Sensor Data:
- From the main screen, press the Menu/OK button to open the menu.
- Use the Up (▲) and Down (▼) buttons to navigate to “View Sensor Data”.
- Press Menu/OK to enter.
This will open a collection of screens, scrollable using the Up and Down buttons, each showing different sensor information:
BME390 Sensor Data
The Pocket Tracker is equipped with a BME390 sensor that measures:
- Atmospheric Pressure
Displays the current pressure along with a 12-hour trend chart at the bottom of the screen. - Temperature
Displays the current internal temperature with a 12-hour trend chart. Note: The temperature reading reflects the internal device temperature, which may be higher than the actual external ambient temperature.
Compass
The Pocket Tracker includes a compass based on data from the BNO086 sensor.
- This sensor is auto-calibrating. For accurate readings:
- Move the device around in figure-8 shapes for a few seconds.
- After calibration, the compass will provide reliable directional data.
For a deeper understanding of compass calibration and usage, check out Issue #4 of the Pocket Tracker Insider newsletter.
Runtime Data
This screen displays key runtime and system statistics:
- Total time since startup
- Total time the GNSS module was ON
- Time since last charge
- System voltages:
- Battery voltage
- System voltage, which is usually the same as the battery voltage unless the device is powered via USB-C. If USB-C is connected, the system voltage will reflect the USB power supply due to the internal power path management that selects USB power when available, or battery otherwise.
External Sensors
The final screen is dedicated to external sensors that can be connected via the 2.5mm jack. Here, you can view real-time data from any compatible external sensor modules connected to your Pocket Tracker.
Flashlight
The Pocket Tracker includes a built-in flashlight, a hidden gem that can be extremely useful in low-light situations.
How to turn the flashlight on or off:
- Press the Menu/OK button twice rapidly.
This quick double-press will toggle the flashlight, allowing you to use your Pocket Tracker as a convenient light source when needed – whether you’re navigating menus in the dark, checking your surroundings at night, or simply looking for something in your bag.

Want the Latest News?
Subscribe to the dedicated PocketTracker newsletter! You will be notified when the Kit is available and I’ll share the latest updates, technical improvements, and behind-the-scenes insights—so you never miss a thing!
