
In this second part of the Wi-Fi-controlled Pokéball project, I’ll guide you through setting up the ESP32-S3 to serve the web app directly to a connected client. This involves configuring a basic HTTP server on the ESP32, initializing it, and handling URI requests to serve our HTML, CSS, and JavaScript files. I’ll also cover building a minimal web page as a foundation for user interaction, focusing on the firmware setup and front-end essentials. By the end, we’ll have a fully accessible web app, setting the stage for upcoming interactive features. If you miss the previous steps, check out the Part 1.
Setting Up the ESP32-S3 Server: Initialization and Configuration
To serve HTML, CSS, and JavaScript files from the ESP32-S3 and support client interactivity, we need to configure an HTTP server. This setup allows the ESP32-S3 to act as a web server, handling requests for resources and WebSocket connections to enable real-time data exchange.
The function start_webserver accomplishes this by defining specific URI handlers, each linked to a resource or endpoint, such as the HTML interface or WebSocket. Here’s the code that sets up this server structure, ensuring our device can communicate effectively with any connected client.
static httpd_handle_t start_webserver(void)
{
    httpd_config_t config = HTTPD_DEFAULT_CONFIG();
    config.lru_purge_enable = true;

    httpd_uri_t ws = {
        .uri = "/ws",
        .method = HTTP_GET,
        .handler = handle_ws_req,
        .user_ctx = NULL,
        .is_websocket = true
    };
    httpd_uri_t index_html = {
        .uri = "/index.html",
        .method = HTTP_GET,
        .handler = index_html_get_handler,
        .user_ctx = "Index_html"
    };
    httpd_uri_t style_css = {
        .uri = "/styles.css",
        .method = HTTP_GET,
        .handler = style_css_get_handler,
        .user_ctx = "style_css"
    };
    httpd_uri_t script_js = {
        .uri = "/script.js",
        .method = HTTP_GET,
        .handler = script_js_get_handler,
        .user_ctx = "script_js"
    };
    // Start the httpd server
    ESP_LOGI(TAG, "Starting server on port: '%d'", config.server_port);
    if (httpd_start(&server, &config) == ESP_OK) {
        // Set URI handlers
        ESP_LOGI(TAG, "Registering URI handlers");
        httpd_register_uri_handler(server, &index_html );
        httpd_register_uri_handler(server, &style_css );
        httpd_register_uri_handler(server, &script_js );
        httpd_register_uri_handler(server, &ws );
        return server;
    }

    ESP_LOGI(TAG, "Error starting server!");

    return NULL;
}
Let’s breakdown the code here:
- HTTP Server Configuration: A default HTTP server configuration is created, with Least Recently Used (LRU) purge enabled to manage memory more effectively by clearing out unneeded resources when capacity is reached.
- URI Definitions: URI definitions specify unique paths for resources on a server, helping the server know which resource a client is requesting. In the context of an ESP32 web server, each URI definition maps a specific path, like
/index.html. These definitions also specify the HTTP method (e.g.,GET) and whether a particular URI requires special handling, like enabling WebSocket communication. This structured mapping is essential for serving web content and handling client requests effectively. - Starting the Server and Registering Handlers: using the function httpd_start we start the server on the ESP32S3 and if successfull we register the handler for our html,css,js and websocket.
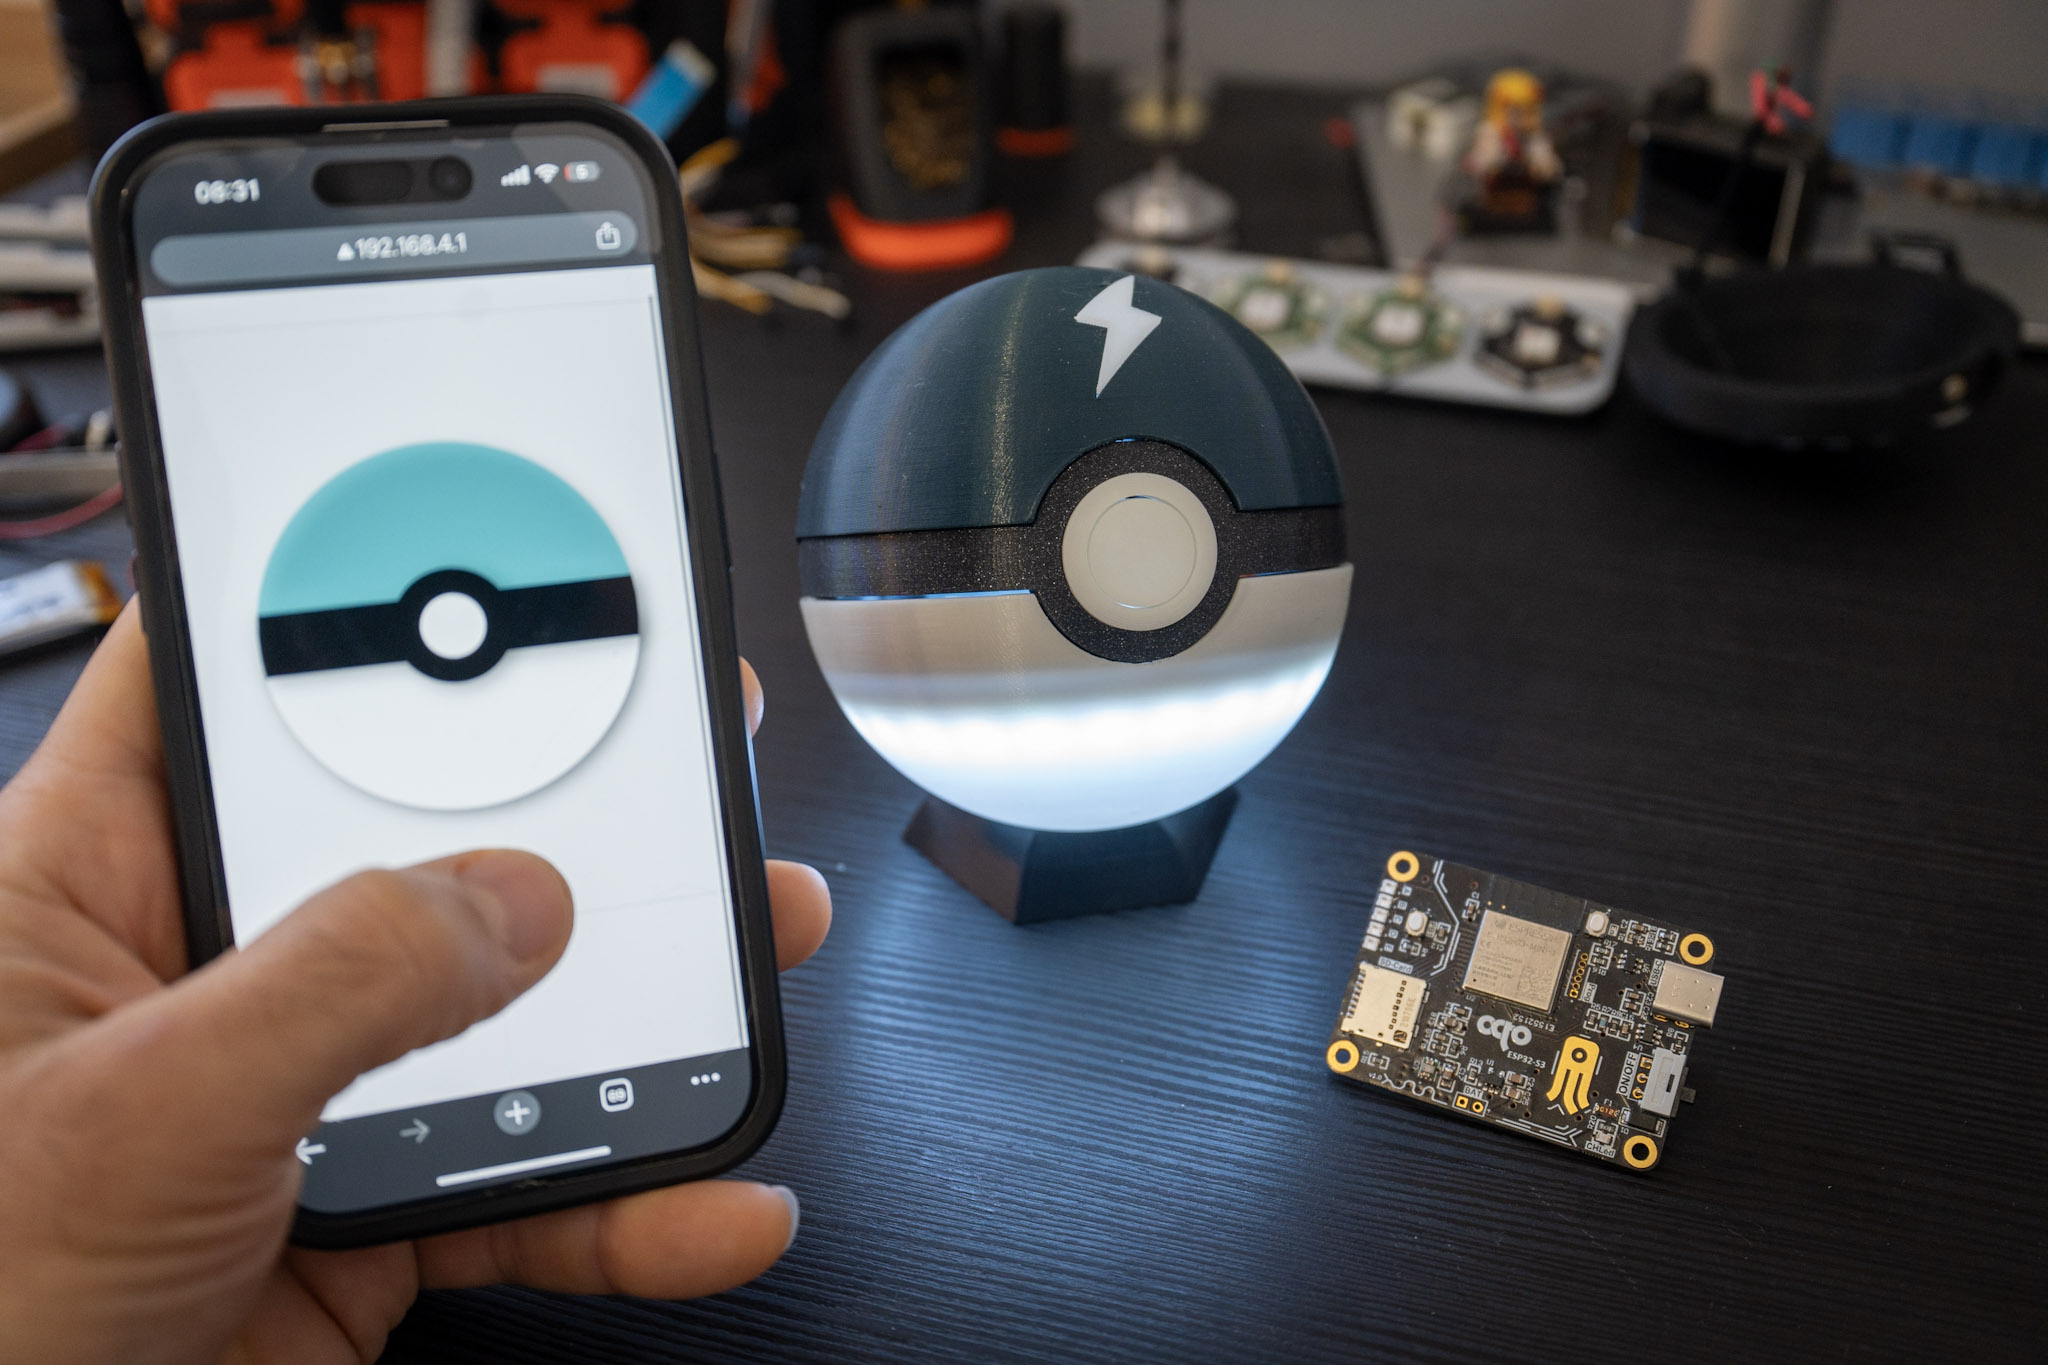
Once this function is called in app_main(), we can connect to the ESP32-S3’s Wi-Fi network and using a web browser, we can request the web interface by entering the device’s IP address followed by /index.html (e.g., http://ESP32S3_IP/index.html). This triggers the ESP32 to serve the HTML page, allowing interaction with the web interface directly from the connected client device. Through this setup, the ESP32-S3 hosts and manages the web content, making it accessible to any browser connected to its network. Now I need to implement the handler functions to make this effective and working.
Handling Client Requests: Implementing the URI Handler
In the previous code, I registered a handler for each URI definition. This means that every time the client requests a specific URL, the ESP32 executes the corresponding registered handler. Essentially, the handler contains the code responsible for serving the web page, the web app file, or even processing WebSocket messages.
In this section, I’ll focus on implementing the functionality to serve the web page, leaving WebSocket implementation for the next part. While handlers can be much more complex—for instance, they can also handle and process queries—for simplicity, I’ll limit the implementation to sending back the requested file.
static esp_err_t index_html_get_handler(httpd_req_t *req){
    /* Get handle to embedded file upload script */
    extern const unsigned char index_html_start[] asm("_binary_index_html_start");
    extern const unsigned char index_html_end[]   asm("_binary_index_html_end");
    const size_t index_html_size = (index_html_end - index_html_start);
    ESP_LOGI(TAG, "File size html: %d",index_html_size );
    httpd_resp_send(req, (const char *)index_html_start, index_html_size );
    return ESP_OK;
}
Let’s break down it:
- Accesses Embedded HTML Content: The embedded HTML file (
index_html) is stored in the binary as a range of memory addresses and calculate the size. - Sends the HTML File as a Response:The HTML content is sent to the client using the function httpd_resp_send
The functions style_css_get_handler and script_js_get_handler are basically the same as the index_html_get_handler, they just serve a different file (the style fiel and js file).
Now we nee a web interface, so let’s jump into it.
Building the Web Interface: Simple HTML, CSS, and JavaScript
In Part 1 of this tutorial, I created a folder called “front” where I stored the web interface files: index.html, styles.css, and script.js. Now it’s time to fill them with some code.
To give a brief introduction:
- The HTML is is the structure of the webpage. It defines the elements on the page such as headings, paragraphs, images, links, forms, and other content. HTML provides the basic skeleton of a web page, organizing content into elements that the browser can render.
- The CSS is responsible for the presentation and design of the webpage. It defines the layout, colors, fonts, spacing, and other visual elements, allowing you to style the HTML elements.
- The JavaScript (JS) adds interactivity and dynamic behavior to a webpage. It can manipulate HTML and CSS to create things like animations, form validation, interactive maps, and other real-time features. JS allows the page to respond to user actions without needing to reload, making the web experience more engaging.
In the following two blocks, you’ll find the code for the HTML and CSS files. The HTML sets up a webpage with a canvas for drawing a 2D Pokeball and includes a hidden color picker to customize its color (we’ll see this in more detail in the JavaScript section). The CSS uses Flexbox to center the content on the page, adds a light background for contrast, and ensures the canvas and color picker are vertically aligned with proper spacing. The canvas features a subtle border, resulting in a clean and responsive layout.
index.html
<!DOCTYPE html>
<html lang="en">
<head>
    <meta charset="UTF-8">
    <meta name="viewport" content="width=device-width, initial-scale=1.0">
    <title>2D Pokeball</title>
    <link rel="stylesheet" href="styles.css">
</head>
<body>
    <div class="container">
        <!-- Canvas for the sphere -->
        <canvas id="sphereCanvas" width="500" height="500"></canvas>

        <!-- Color picker positioned below the canvas -->
        <div class="color-picker-container">
            <!--<label for="colorPicker">Pokeball Color:</label>-->
            <input type="color" id="colorPickerBottom" value="#ff0000" style="display: none; position: absolute;" >
        </div>
    </div>
    <script src="script.js"></script>
</body>
</html>
styles.css
body {
    display: flex;
    justify-content: center;
    align-items: center;
    height: 100vh;
    background-color: #f0f0f0; /* Light background for contrast */
    margin: 0;
}

canvas {
    border: 1px solid #ccc; /* Optional border around the canvas */
}

/* Container for canvas and color picker */
.container {
    display: flex;
    flex-direction: column;
    align-items: center;
}

/* Space between the canvas and the color picker */
.color-picker-container {
    margin-top: 10px;
    text-align: center;
}
Now let’s jump into the exciting part: the JavaScript!
The main goals of the JavaScript code are:
- Draw a 2D Pokeball on the web page: Using the HTML canvas, I draw the Pokeball by combining arcs, lines, and filled shapes. The top and bottom halves, the central black band, and the inner circles are all created with carefully positioned drawing commands. I also add shadow effects for a more dynamic and polished appearance.
- Toggle the bottom part of the Pokeball on and off: I add a click listener to the canvas, specifically targeting the bottom half of the Pokeball. Each time the user clicks on this region, the color toggles between the default (white) and the currently selected color, creating an interactive effect.
- Change the color of the bottom part: To make it customizable, I implement a long press detection mechanism. This uses
mousedown/mouseupandtouchstart/touchendlisteners to support both desktop and mobile devices. A timer checks if the press lasts long enough to trigger the color picker. When detected, the color picker appears near the press point, allowing the user to select a new color. The chosen color is stored in a variable and applied to the Pokeball whenever it is toggled on.
script.js
const canvas = document.getElementById('sphereCanvas');
const ctx = canvas.getContext('2d');
const sq_dim = 250;		//square dimension
const radius_dim = 150; //radius dimension

let pressTimer; // Variable to track long press duration
let isOn = false;

const colorPickerBottom = document.getElementById('colorPickerBottom');
const colorPickerCenter = document.getElementById('colorCenter');

// Default color
let sphereColor = colorPickerBottom.value;

// Event listener for color picker change
colorPickerBottom.addEventListener('input', (event) => {
    sphereColor = event.target.value; // Update the sphere color
    drawSphere(); // Redraw the sphere with the new color
});

function drawSphereSlice(radius, startAngle, endAngle) {
    ctx.beginPath();
    ctx.arc(sq_dim, sq_dim, radius, startAngle, endAngle, false);
    ctx.lineTo(sq_dim + radius * Math.cos(endAngle), sq_dim + radius * Math.sin(endAngle));
    ctx.closePath();
    ctx.fillStyle = isOn ? 'rgba(255, 0, 0, 0.6)' : 'white';
    ctx.fill();
}

function drawBand(radius, startAngle, endAngle) {
    ctx.beginPath();
    if(startAngle > 0){
        ctx.arc(sq_dim, sq_dim, radius, 0, startAngle, false);
        ctx.lineTo(sq_dim + radius * Math.cos(endAngle), sq_dim + radius * Math.sin(endAngle));
        ctx.arc(sq_dim, sq_dim, radius, endAngle, Math.PI, false);
        ctx.lineTo(sq_dim + radius , sq_dim  );
    }else{
	ctx.arc(sq_dim, sq_dim, radius, startAngle, 0, false);
	ctx.lineTo(sq_dim + radius , sq_dim  );
	ctx.arc(sq_dim, sq_dim, radius, Math.PI,endAngle, false);
	ctx.lineTo(sq_dim + radius * Math.cos(endAngle), sq_dim + radius * Math.sin(endAngle));
    }
    ctx.closePath();
    ctx.fillStyle ='black'; // Updated color;
    ctx.fill();
}
// Function to draw the sphere
function drawSphere() {
    ctx.clearRect(0, 0, canvas.width, canvas.height);

    // Set shadow properties
    ctx.shadowColor = 'rgba(0, 0, 0, 0.5)'; // Shadow color
    ctx.shadowBlur = 15; // Blur level of the shadow
    ctx.shadowOffsetX = 5; // Horizontal offset of the shadow
    ctx.shadowOffsetY = 5; // Vertical offset of the shadow

    // Draw top half with new color
    ctx.beginPath();
    ctx.arc(sq_dim, sq_dim, radius_dim, Math.PI, 0, false);
    ctx.lineTo(sq_dim, sq_dim);
    ctx.closePath();
    ctx.fillStyle = 'rgba(0, 140, 149, 0.5)';
    ctx.fill();

    // Draw bottom half with new color
    ctx.beginPath();
    ctx.arc(sq_dim, sq_dim, radius_dim, 0, Math.PI, false);
    ctx.lineTo(sq_dim, sq_dim);
    ctx.closePath();
    ctx.fillStyle = isOn ? sphereColor : 'white'; // Updated color
    ctx.fill();

    // Draw central black band
    drawBand(radius_dim, Math.PI/18, Math.PI - Math.PI/18 );
    drawBand(radius_dim, -Math.PI/18, Math.PI + Math.PI/18  );

    // Draw black circle in the middle
    ctx.beginPath();
    ctx.arc(sq_dim, sq_dim, sq_dim/5.25, 0, Math.PI * 2);
    ctx.fillStyle = 'black';
    ctx.fill();

    // Draw white circle in the middle of the black circle
    ctx.beginPath();
    ctx.arc(sq_dim, sq_dim, sq_dim/10, 0, Math.PI * 2); // White circle
    ctx.fillStyle = 'white';
    ctx.fill();

}

// Event listener for canvas click
canvas.addEventListener('click', (event) => {
    const { offsetX, offsetY } = event;
    const bottomHalfY = sq_dim + sq_dim/10;//sq_dim; // Center Y position of the canvas

    // Check if the click is on the bottom half
    if((offsetY > bottomHalfY)&(offsetY < sq_dim+radius_dim)) {
        isOn = !isOn; // Toggle color
        drawSphere(); // Redraw the sphere
    }
});

// Detect long press on canvas for both mouse and touch
canvas.addEventListener('mousedown', startPressTimer);
canvas.addEventListener('mouseup', clearPressTimer);
canvas.addEventListener('mouseleave', clearPressTimer);
canvas.addEventListener('touchstart', startPressTimer);
canvas.addEventListener('touchend', clearPressTimer);
canvas.addEventListener('touchcancel', clearPressTimer);

function startPressTimer(event) {
    colorPickerBottom.style.display = 'none'; // Hide color picker after selection

    const offsetXPosition = 50; // Offset in pixels to the right
    const offsetYPosition = 50; // Offset in pixels downwards

    const { offsetX, offsetY } = event.type === 'touchstart'
        ? { offsetX: event.touches[0].clientX - canvas.getBoundingClientRect().left,
            offsetY: event.touches[0].clientY - canvas.getBoundingClientRect().top }
        : event;

    const bottomHalfY = sq_dim + sq_dim / 10;

    // Check if the click is in the bottom half region
    if(offsetY > bottomHalfY && offsetY < sq_dim + radius_dim) {
        pressTimer = setTimeout(() => {
	    const xPosition = (event.pageX || event.touches[0].pageX) - offsetXPosition;
            const yPosition = (event.pageY || event.touches[0].pageY) - offsetYPosition;
            colorPickerBottom.style.left = `${xPosition}px`;
            colorPickerBottom.style.top = `${yPosition}px`;
            colorPickerBottom.style.display = 'block';
	    isOn = !isOn; // Toggle color
        }, 500);
    }
}

function clearPressTimer() {
    clearTimeout(pressTimer);
}

// Initial draw
drawSphere();
To preview your progress directly on the computer you’re coding on, you can simply open the HTML file in your browser. This allows you to see the visual results of your HTML, CSS, and JavaScript code immediately. However, keep in mind that this setup won’t communicate with ESP32 unless your browser is connected to the ESP device, as the browser is only executing the local code.
Part 3 Preview
In conclusion, by implementing the modifications demonstrated in this article and integrating the provided HTML, CSS, and JavaScript code, you’ll enable a fully functional web interface for the Pokeball. Once deployed on the ESP32-S3, you’ll be able to connect to the Pokeball’s Wi-Fi network and access the web page by navigating to http://ESP32S3_IP/index.html in your browser.
On the web page, you’ll see the Pokeball graphic, which you can interact with. A simple click on the bottom half toggles its color, while a long press reveals a color picker, letting you customize the bottom half’s appearance to your liking.
Although this implementation is already quite engaging, it’s only the beginning! In the next article, I’ll delve into adding WebSocket functionality, enabling real-time interactions and opening up a whole new level of possibilities for your Pokeball project. Stay tuned!

Thank you for reading and supporting my blog! If you enjoyed this content and would like to help me continue creating more, please consider leaving a donation. Your generosity will help me cover the costs of materials and tools for future projects. Any amount is greatly appreciated! And remember to follow me on Instagram for more updates and behind-the-scenes content.